Monday, December 30, 2019

Christmas Presents!

Now that the Christmas presents have been given. I am now able to post this. I have a video in here of the entire cutting process. So I have made it as short as I thought I should. They have been sped up. If you think they are long now imagine watching in real time!

By the way have I ever said how much I dislike painting projects? Not for the reason you would think. Not because it hides the wood. It does do that but because I just really don't like painting. I would rather spend days sanding then even a day painting. This project was hours of painting. The final product looks good but man do I dislike painting things when there are multiple surfaces to paint and it is not just cover this with paint.

I decided on designing my own pattern for this years gift. I also decided to cut with an angle to drop the letter into it. It is very interesting to cut at an angle. You start with doing all the 90°. Then if you want the letters to drop in you need to cut the cut at this type of angle \. To be exact what I used was 4° off of 90°. So depending on if your blade tilts or the table tilts that is what determines which way +4° or -4°. I used a Flying Dutchman 5 ultra reverse blade so with the kerf of that bade and 4° tilt I get about 3/16" inset. If I went the other way I would get a 3/16" outset. So I wanted to to drop. The main reason is then I was able to sand down the letter backs sticking out the back to make them flush with the board. To drop you must remember that the cut needs to be wider at the top with the kerf cut it will cause the shape to fall in and eventual jam in place. You just put glue on it and push the shape in and let it dry.

Here is the pattern I created. You can freely use this pattern. The only restrictions I place on this is that you can not sell the pattern. You can give the pattern away you just can't sell the pattern. You can always sell the item you make if that is what you wan to do.

I have two versions of the pattern. One that is the full pattern and one that is the pattern split in two pieces. This is 14 3/4 wide so you will need to piece it together or print it to fit on a legal size sheet of paper. I made the outlines red simply because I like to follow red rather then black lines. As I get older I lose the blade in black. While I can see it clearly against a red background. You cut the outside at 90 and cut the letters at either 94 or 86 depending on if your table tilts or the blade tilts. Also depending on if you want outset or inset letters

You also need to remember when you drill your holes to drill them at the same angle.

Here are the patterns

Full

Two halves


Here is the video of my cutting one of these.


Some single shots of the project

The frame and letters v\cut out with the pattern still attached


All cut and pattern removed. I numbed the pieces not so much to tell where they go but so when I was painting them I would paint the proper side. You would be surprised to know how often I would have the wrong side facing me. 


All glued up and mostly painted. Sanding down the letters now. The one in the back sis all sanded down while the one in front is up next to sand.


I used a belt sander to take the bulk off then I used a random orbit sander to do the final bit to smoth it out.

For the final look at the front and back of a couple of the finished ones.


I also purchased these made by coins from Steve Good @ scrollsawworkshop.blogspot.com


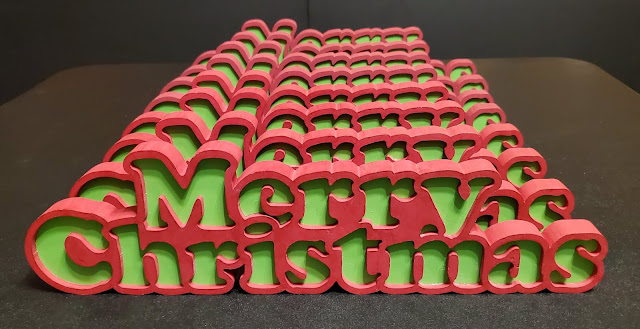
The whole stack of these I made


Thanks for looking
Jim

Monday, December 23, 2019

Circle Jig for the router

I needed to make a perfect circle so I made a circle jig for my router. I can do a 4 foot circle with this. I do need to make a 40" circle so it will be used almost to the full range.


I just took off the face plate and traced it. I then used by power strop for the smaller circle and drew lines between the two circles. I cut it out on my scroll saw. Then I mounted it to the router and let the router drill the hole. I marked off 1/2" distances from the edge of the bit.

Now to make a circle. But I won't get to that till next year since I am out of time and my van was in the shop so I could not pick up the ply to cut the circle. Now Christmas is upon me I won't be able to get it done before I have to leave town. So next year! I have my first project awaiting me already!

Thanks for looking!
Jim

Sunday, November 17, 2019

Christmas Presents!

Yes it is that time of year. I am working on one of my own designs this year. Trying something new with angle cutting on the scroll saw. The idea is to have the pieces drop into the work piece to give a 3d effect. All it takes is a 4° angle, When you make the cut it will be sort of like \       /. As you see it is wider at the top of the cut the the bottom. Which with the blade kerf means the shape you cut will drop in and stop. If you were to change the angle to be the opposite way /    \. The shape would come out and stop. It so happens that 4° will give you about 3/16" level change either out or in depending on which way you cut the object. You do have to put glue on the piece to keep it in place. SO since the kerf helps to set the distance the size of your blade will also determine how far it moves. I almost always use a Ultra Reverse #5 for everything that is not fret work.

The tough thing can be drilling the hole at 4°. But I happen to have a setup that is almost a perfect 4° so I can drill the holes at the right angle. The small drill press I have can not hold the very small drill bits but it is easily set at 4°. But I have block of wood I place next to my dremel dill press which happens to create the 4° angle.

If you have it pop out it will leave a depression in the back. Likewise if you drop in it will stick out the back. If you drop it out the back you can sand/plane it off so that the back will be flat. Or you can just leave it hang out the back.

Sometimes when you come across a pattern that says self framing this is what will be done. You will cut at a 4° angle or so and the outer edge will come forward providing you with a built in frame.

You can vary the angle which will vary the amount the piece comes out of goes in. Like I said a 4° will give you about 3/16" drop or pop with a ultra reverse #5

Anyway no pictures till after Christmas. Hopefully what I have said will make sense to you.

Thanks for reading!
Jim

Monday, October 28, 2019

All 4 Blue Ribbons

Here are my 4 in a row blue ribbons from the NC State Fair left to right as follows:

2016 The Mermaid (Sue Mey)
2017 The Bully (Mike Williams)
2018 Lion Roaring (Charles Dearing)
2019 AS Darkness Falls (Mike Williams)


Links to each pattern is the Artists name.

Now each one by itself as best as I can get it.

Mermaid with a crown
Cut out of 1/8" Baltic Ply Mounted to 3/4" Pine


The Bully
Cut 1/4" Oak Ply
Purpleheart Frame


Lion Roaring
1/4" Cherry
Yellow Heart Frame


As Darkness Falls

Cut  1/2" Basswood live edge


Thanks for looking
Jim

Saturday, October 19, 2019

4th blue in a row!

Well I found out I won First Place for the fourth time in four years! The number of goofs that I had to repair and or change the cut was above average for me. As a previous post explained my bottom clamp on the saw was breaking and thus why the goofs. The tension on the blade was not as tight as it should have been and finally just before the end it broke and would not hold the blade at all on the bottom. Then I worked out a solution to clamp the blade while waiting on the new bottom clamp.

I always say mistakes happen patterns are a guide. If something goes wrong examine the mistake and see how you can change the cut so that it is no longer is an issue and still looks like it belongs.


Thanks for looking
Jim

Tuesday, October 15, 2019

Its all over but the crying

I dropped my entry off at the NC State Fair over the weekend. Judging was today Tuesday the 15th. So by now I have most likely won a ribbon. It is the same people every year that enter. I was able to gaze at the list of entries in the book when I dropped it off and I saw all the usual names for the competition this year. Eventually I will not  get the blue ribbon. Maybe this year as the flaws are plenty. I seemed to have to hide more mistakes this year then in years past. Well I will know this week probably if someone I know goes before I do to the fair.

I need a new phone as the camera in my current phone has a broken lens so I try not to take pictures but this one was taken with the phone. Ignore the strange artifacts in the pic

This is a shot of where I dropped the entry off. You can see a ferris wheel in the background. But this year they have this massive ferris wheel that makes this one look tiny.


Thanks for looking!
Jim

Saturday, October 5, 2019

Glued up and ready

Well it is all glued up and ready for drop off in a week. This is the part I dislike. I see every single flaw in this cutting. I can't help it. I don't point them out but I see everything and think. Man this is terrible how this came out.

But here it is.Things I did not like! The wood! This is not good wood for scrolling that is for sure. Will I use it again? Right now I am saying no. But we will see. The saw dust, man glitter, was just a pain. It stuck to the project in all the nooks and crannies. I am pretty sure it still has some stuck in there. I have never seen saw dust like this before.

Front


Back


Thanks for looking
Jim

Saturday, September 28, 2019

Cuts are done

Well the night of cutting started out disappointing. I finally figured out why I have been making so many goofs with the cuts. It was just not obvious as it degrading over the time I was cutting. But the reason I was goofing up was I kept noticing the blade was getting loose which was making the fine scroll saw blade to flex and cut where it should not. So you exacerbate the issue by making the blade holder tighter and tighter.

Tonight I could not even tension the blade with out it popping out before I could even start the saw. Finally I noticed the problem. The bottom blade clamp is cracked and as I tighten the blade the clamp moves apart thus applying very little tension. So when I would throw the quick blade tension knob the blade would pop out.

So I take the scroll saw table top off to get a good look and yup there is a nice crack in the clamp. So over the past 6 or so years the thing just had a stress fracture take place. It is not all that expensive to replace but it will take time to get here. Probably not going to finish this in time.

So here I am sitting watching some walking dead on Netflix and suddenly the design aspects of the clamp come to mind and plain as day I know how to secure the blade and cut more! So very excited that I run out to my workshop and implement the idea and sure enough the blade is staying tight. It is going to ruin the blade in a way that it is now a one use blade. But all I have is a couple of large pieces to cut out so I can go with this idea as I will just need two blades to finish. I would probably use two blades anyway so no real loss.

If I had a lot of small cuts it would not have been good to use it this way. But heck now I am done and can get this thing cleaned up and apply the danish oil and drop it off in a couple of weeks for the State Fair!

Yes


Thanks for looking!
Jim

Thursday, September 26, 2019

More progress one more day!

It was slow going tonight so I did not get much done. I had to do more repairs again. I just don't get what is happening. After the second I said that's enough for the night. I thought I was going to finish the cuts but can't keep pushing when something is just not quite right.


Thanks for looking
Jim

Wednesday, September 25, 2019

Just a day or so left

Almost done for cutting.  I almost had a huge mistake. For some it would have been a disappointment to have it happen. But over the years I have learned how to "fix" those issues to hide the goof. Thus why I did not cut more tonight. Once I have one of those did I just ruin the piece moments it is time to call it a night. It does not matter if I have been cutting for 5 minutes or hours. My personal policy is to quit for the day or night. It always seems to scare me enough that I loose confidence for the rest of the day/night even after fixing it so it no longer matters. Which is a great sense of relief.

Anyhow here are tonight's pictures

 Front side


Back side


Thanks for looking
Jim

Monday, September 23, 2019

Closer yet

Just a couple more days I expect and it will be done. Which should be good. As I am now officially behind all past years in completing the project for the NC State Fair. I am not having to frame it this year but I still need to put Danish Oil on it and that takes at least 5 days to dry. In the past if I rushed and put the backer on too soon the wood has warped if it is not dry. That is how you learn sometimes by your mistakes. It would be nice if you just would learn but sometimes it takes a goof to remember "Take your time and don't rush!"

There are some large sections still to be cut out. Those will give the trees and owl better definition. Once they are cut everything should just pop. But the large pieces need to be cut last to keep the strength for the cuts near them.

One other thing you should know. The skill is not just using the scroll saw. The skill is knowing how to hide the messed up cut so that it looks like it was supposed to be that way. WHen a person looks at your work they have no clue what the pattern looked like. So long as you keep the gernal feel and look no one knows where you messed up.

Don't toss a project just because there is a goof up. OK sometimes the goof up is a project ending mistake. But with fret projects there is so much room for changes you can usually cover up the mistake. I won't tell you how many are already there but more then one!

This is where I am at now


Not the pattern side.


Thanks for looking!
Jim

Saturday, September 21, 2019

It is slowly getting there!

I just wish I had more time for my hobby. I will get this done but it is taking way longer then I would like it to. Now  a major project at work was moved up a month early and that could take all my spare time. Spare time? Is that not like spare money? You just don't have any!


Anyway I have made more progress on this thing. I should still be able to make it. For the past two years this week was the week that I was putting the finally touches on everything. This year still cutting.

Here is my progress so far.

Front view so you see what it will be.


Back side so you can see without the pattern.


A closeup of the small blade using to cut this.


Just a general shot of it in progress on the saw.


Thanks for looking!

Jim

Sunday, September 8, 2019

More work plus an off the cuff piece

Well I did more on my project. But I was side tracked for a bit as I was finding turning the little handle for the blade tensioner a bit tedious with all the small little bits I have to cut for this project I seem to be spending more time inserting the blade in the the project then I do cutting. So I just "off the cuff" designed and cut this little wooden knob extension to make turning the handle easier. It was quick and dirty just took off one of the handles, there are two, one the arm above the table and one below the table, and I did a quick tracing of the handle profile. . I am a top feeder so I loosen and tighten the one below the table constantly. So this just makes it larger and easier on the fingers. Of course they designed the handle to be wider at the back so it would not fit initially. I just put in a spiral blade and made the hole bigger till it was able to slide on. Then I sanded it to knock down the sharp edges so that it would be comfortable for my fingers. This is what it turned out like and how it fits on the handle. I just put it on to turn the handle then take it right off. I cut this out of some yellowheart scraps I had laying around.

The part


Another view


What it looks like on the knob


Now I did get some more done on my project too. Here are some more pictures of where I am at. Still a bit of work to go but I do have 4 weeks.

The whole board


A close up of the area cut


Thanks for looking
Jim

Saturday, September 7, 2019

It has been a while hasn't?

Well I am working on my next NC State Fair entry. This pattern is by Mike Williams called "As Darkness Falls". By the way the name of the pattern is linked to the pattern if you wish to purchase it.

I am cutting this on a Basswood live edge oblong piece. I wanted to try something different this year and I saw this and figured I could adapt the pattern to fit it. So I printed it out and figured out how much of the pattern I could fit within the slab and I came up with something that looked like it would work.

I have not cut much but it should be done on time.

An overall picture of everything


A shot of what I have cut so far


I am using a new blade this year. I keep hearing so much about Pegas blades that I purchased some. Of  course this is using spirals and spirals are just plain different from normal scroll saw blades and cutting straight with them is not simple since the blade will cut in any direction. These are Spiral Scroll Saw Blades #0. They cut nicely and seem to have very few if any fuzzes on the back which is a nice thing as cleanup when I am done will be quicker then normal. Usually I have to spend a bit of time with very small files getting rid of them. Hopefully these will reduce that time.

Well thanks for looking.
Jim

Thursday, May 2, 2019

I 3d printed a moon

So I found this on-line and printed it. It was not too difficult to get it to print. The first run I tried with no supports. It was in the very beginning and I could see it was trying to print in mid air off the build plate. Not good but not much wasted. So then I sliced it with a brim and supports. I removed a good chunk of supports before slicing and probably could have taken more away but it was printing fine so I let it go. After 30 hours it was done. Here is the video of the time-lapse of the print job.


Today I decided to check out how it looks illuminated. I did not yet drill a hole to insert any LEDs. I tried just placing what I want to use against the print but it was way too dim to see anything then I thought try your bicycle light that is 1200 lumen's. So that is what I did. It looks pretty good this way. But I still want to try the RGB LEDs. So I guess I will be drilling a hole in this and putting the LEDs inside. I don[t think it will be bright enough but till I do it I won't know for sure.

Depending on how all my experiments work out I will then decided how to make the base.

More experimenting to see how best to display this. The problem will be in a well lit room. I think I will have to use a LED flash light. I really did not want something like that but if that is what I'll have to do. Then that is how it is done. But I am still experimenting with different things.


Thanks for looking
Jim


Wednesday, February 20, 2019

3D Printing Airflow Part 2

Well what I was printing was not for my printer! As the file contains many different parts for different printers with different upgrades and parts. Also what I read about the airflow was outdated and the part had been updated so that did not help. What I ended up doing was actually reading the info with the files to figure out what was needed rather then looking at the 3d objects and saying that looks like that part.

Maybe it is in my head but I do believe that with the nozzle airflow now coming in from both sides rather then one side it prints cleaner and nicer. The PLA coming out is now being cooled more uniformly and as such I don't get the strings anymore. They were where the PLA was pulled away as the head retracted and you would get little hairy strings at times attached. I have not seen them on the prints since I installed all the airflow parts. That is a plus. Less cleanup.

I have also discovered tree supports which is in the experimental section of cura 3.6.0 that I use to slice the models. While that almost hides the print it makes getting the supports off to be a cleaner experience.

The airflow is two parts. The base for the extruder fan and the duct for the nozzle.

The base video


The duct video


The hot end before with the standard parts. The extruder fan in front and to the right the tip fan which you can't really see.


The old parts removed and the new part in place with the fans.


The two pieces printed. The tip fan is now in front and the duct goes to both left and right so the air flow comes from both sides.

Thanks for looking
Jim

Saturday, February 16, 2019

3D Printing air flow for Ender 3 Extruder

First piece done. I have decided since I updated the firmware on the ender 3 to TH3D to provide thermal runaway protection. The stock Ender 3 does not have this in the firmware. Why? That is a good question. But it does not matter now. I had to first take my arduino and connect it to the 3d printer internally since the Ender printer did not have a boot-loader. So I had to program the arduino to program the boot loader to the board. Once I did that I was able to disconnect the arduino and hook directly to the Ender with the laptop and then load up the TH3D firmware which provides the thermal runaway protection. So lets see if printing the new airflow extruder pieces improves the print.

SO this is time-lapse comes from octoprint which runs on a Raspberry PI that I have connected to the printer. It takes this cheap 3D printer and puts it on the web in my house. I can now use an SSH tunnel into my home to monitor/stop/start print jobs. Octoprint also streams my prints to youtube so I can watch them from anywhere since I don't want to put my 3d printer on the web for the whole world to hack.


This is the first piece which is for the fan that cools the actual hot end. I am now printing the air duct for where the filament comes out the nozzle.

Monday, January 28, 2019

Groot AIR Plant pot

I found this in thingiverse  I had blue already loaded up and pretty new so I printed it in blue. I used cura to slice it.  This took about 12 hours to print. Video is a timelapse from octoprint I run on a Raspberry PI connected to the printer to give my 3d printer a web front end to print from and monitor.


Here is a picture with an air plant in it.


Sunday, January 20, 2019

Another set

I've never actually ever have gone back and did a pattern more than once. I promised to make one of these for my wife since I was stack cutting thse at Christmas and I had too many in the pile and I lost a bunch of them when I pushed too hard against the blade. When you do that the blade will curve and when that happens you end up cutting at an angle. For my stack it ment the lower layers where ruined from the flex. So I have done a couple more of these. I was able to stack these as just two and was able to complete the cuts in a signle day. Had a nice warm day here today so it was a good day to cut.


My usual Watco Natural Danish Oil.

I need to figure out what I am doing for the 2019 NC State Fair and get that done earlier then in previous years. Still deciding. I have a bunch of patterns just have to decide.

Tahnks for looking
Jim